

Migrating Wordpress to App Engine - Deploying Wordpress
- Written by John
- Jul 28th, 2019
Everything you’ve done up until now has prepared you and your new environments to easily migrate your Wordpress website from your current platform into Google Cloud Platform. You’re now in a position to start the migration process of your Wordpress files and your database.
Prerequisites
- backup and download your Wordpress files to your PC
- backup and download your Wordpress database - .sql format
Set up MySQL database and users
Before you deploy your Wordpress website into App Engine, the SQL database needs to be fully operational and functioning correctly. Importing your database is straight forward, even for a big website. The difficulty can be to create a user that has database access to your Wordpress database only. The setup of users to databases has to be completed using the command line. Let’s get started.
You’ll need to set up a new MySQL user and allow only that user to your imported Wordpress database. Using Cloud SQL Proxy is a more effortless way to administer MySQL user access to databases, and to set up a development environment on your PC. Navigate to https://cloud.google.com/sql/docs/mysql/sql-proxy and download the cloudsqlproxy application. Run cloudsqlproxy.exe in command prompt with the following parameters. You will need to exchange the instances attribute with your own CloudSQL instance connection details.
cloud_sql_proxy.exe -instances=myProject:us-central1:myInstance=tcp:3306Now you have an active connection into your SQL instance, use your MySQL client in command prompt, as part of Xampp, to connect to your Cloud SQL instance.
~\Documents\wordpress\Xampp\mysql\bin\mysql -u root -p --host 127.0.0.1 --port 3306Create a database, user and grant the user privileges to the database. If your database backup file uses the USE DATABASE statement, you will need to create a database with the same database name. Otherwise, you will need to modify the database name in the USE DATABASE statement.
CREATE DATABASE dbname;CREATE USER 'users_name'@'localhost' IDENTIFIED BY 'users_password';GRANT ALL PRIVILEGES ON *.* TO 'username'@'localhost' IDENTIFIED BY 'users_password';The only user that is set up is root. As part of best practices, you will need to create an administrative MySQL user that can administer all databases.
Importing your Wordpress database
Importing databases into Cloud SQL is straightforward providing your database file is in the .sql or .csv format. Preferably, your database file should be in .sql.
You need to ensure any reference to your old table and domain needs to be amended before you import the .sql file.
- any reference to your old database needs to be amended to your new database (if changed) under the statements CREATE DATABASE or USE DATABASE - this will be at the start of the .sql file
- any reference to your old domain needs to be amended to [http://]127.0.0.1/wordpress-migration - this will be under INSERT INTO `wp_options` VALUES
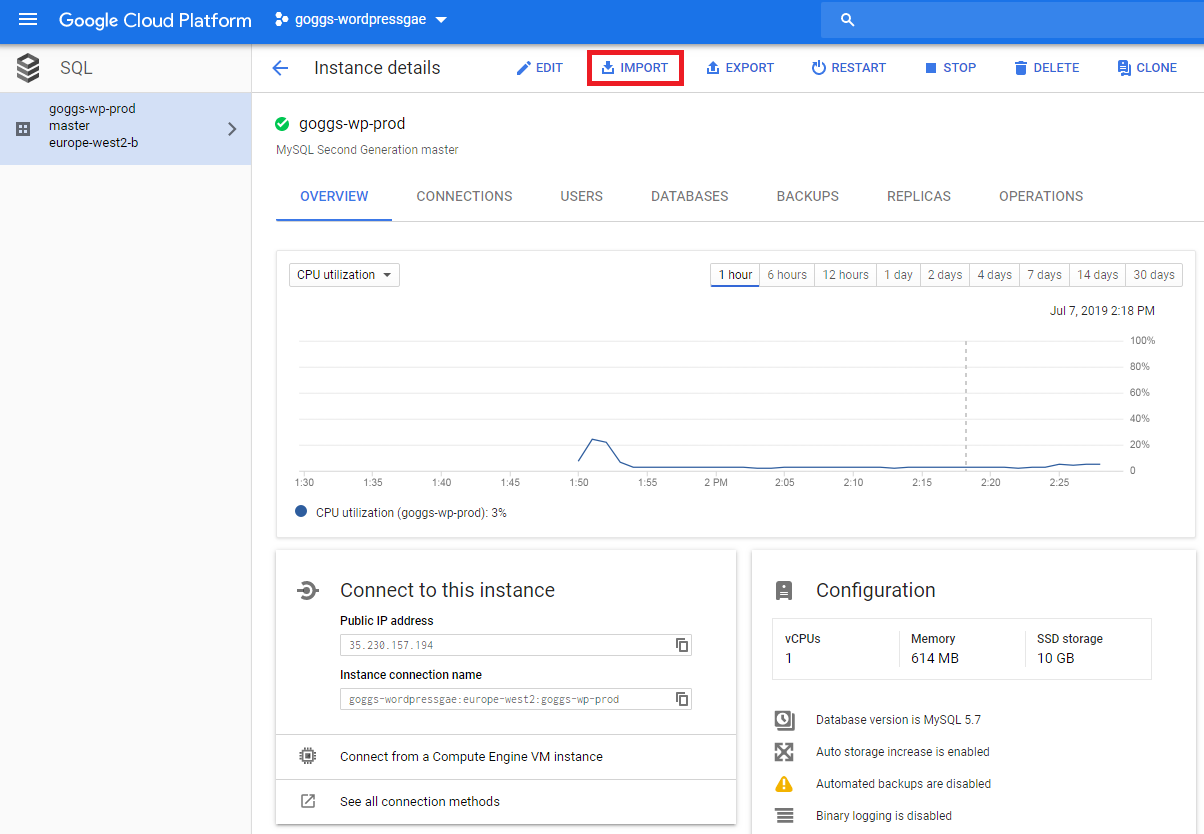
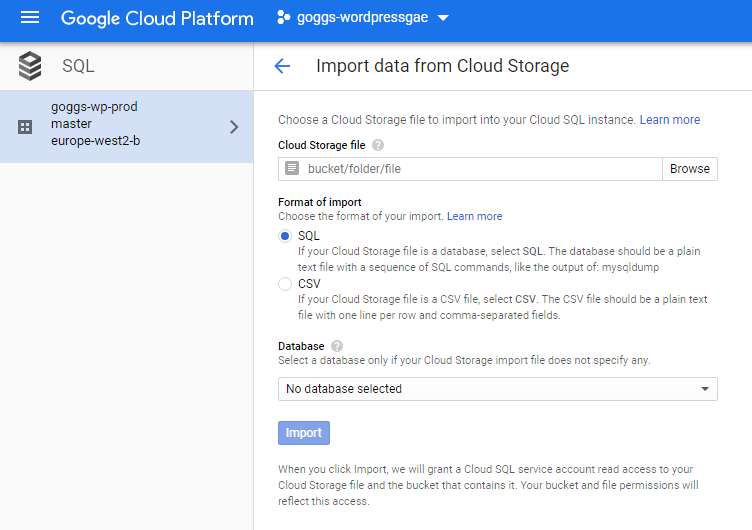
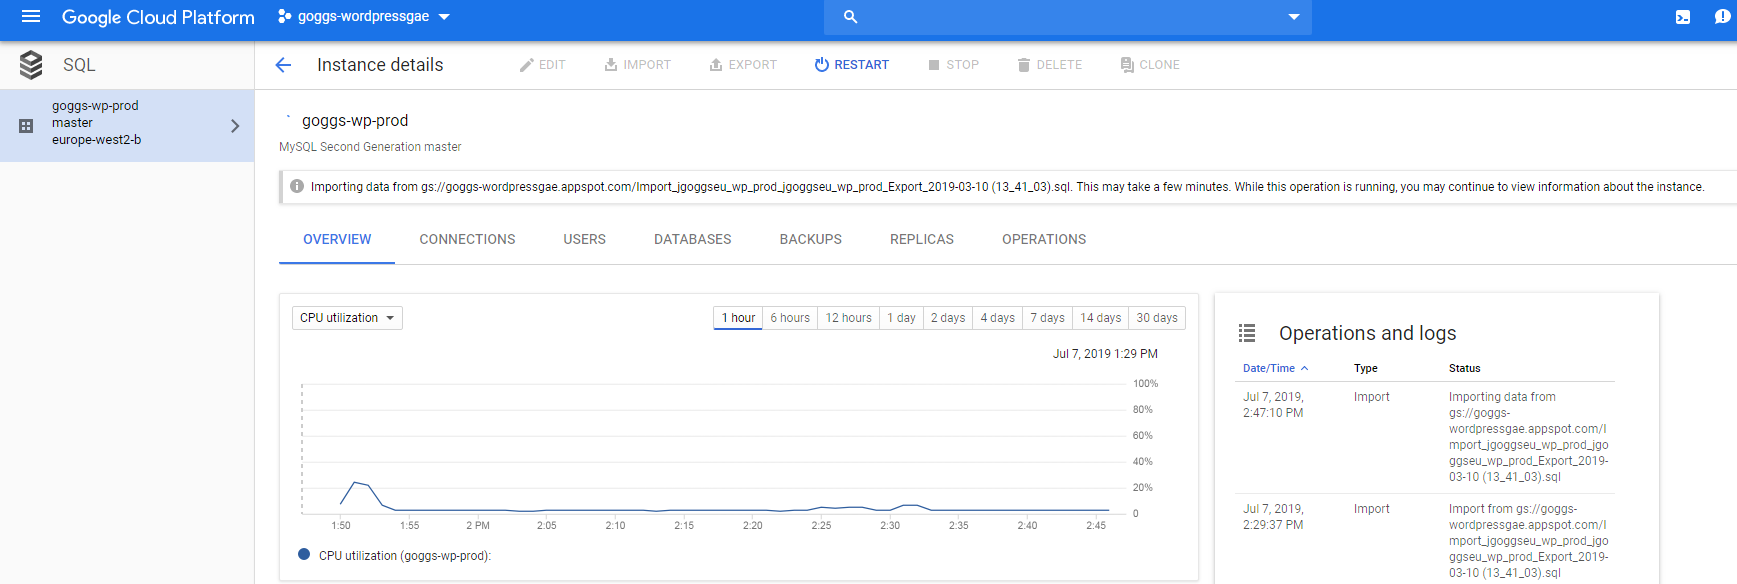
Upload your database file to your default Storage bucket. Navigate to your Cloud SQL instance and click on IMPORT at the top. Find your database backup file and import it. Depending on how big your database file is, depends on how long Cloud SQL will take to import it.

Testing your Wordpress database
Now you have a functioning Cloud SQL database you can use Xampp to verify the database. Copy your Wordpress files to ~\Documents\wordpress\Xampp\htdocs\wordpress-migration and modify your database connection details in your wp-config.php file.
- DB_HOST: 127.0.0.1
- DB_NAME: database_name
- DB_USER: mysql_user
- DB_PASSWORD: mysql_user_password
Start the local Xampp server by running apache_start.bat in the root of the Xampp folder and navigate to http://127.0.0.1/wordpress-migration. You will now have a fully functioning website running off of Cloud SQL.
Run the apache_stop.bat file in the Xampp folder to stop the Apache server. You are now ready to migrate your Wordpress files to App Engine.
Troubleshooting
If you receive a database connection error, check and correct the following areas.
- the database connection details in your wp-config.php file are correct to what has been set up in Cloud SQL
- your Cloud SQL instance is running
- you are running Cloud SQL Proxy under the correct project and instance
Preparing your Wordpress files
You now need to prepare your Wordpress files ready for deployment. Copy your Wordpress files to the migratedfiles folder, ~\Documents\wordpress\migratefiles.
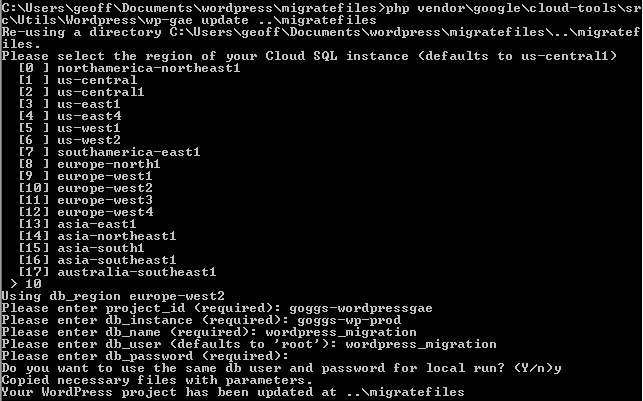
We will be using a tool called Google Cloud Tools to complete the preparation. Once you’ve copied the Wordpress files open command prompt and change the directory to ~\Documents\wordpress\migratefiles and run the following command.
composer require google/cloud-toolsAfter a minute or two, Google Cloud Tools will download into a folder called vendor. Run the following command to update your Wordpress files into an App Engine deployable state.
vendor\bin\wp-gae update ..\migratefiles
The script requests for several pieces of information, to be able to complete the setup. The script will generate several files within your Wordpress file structure and, will update your wp-config.php file.
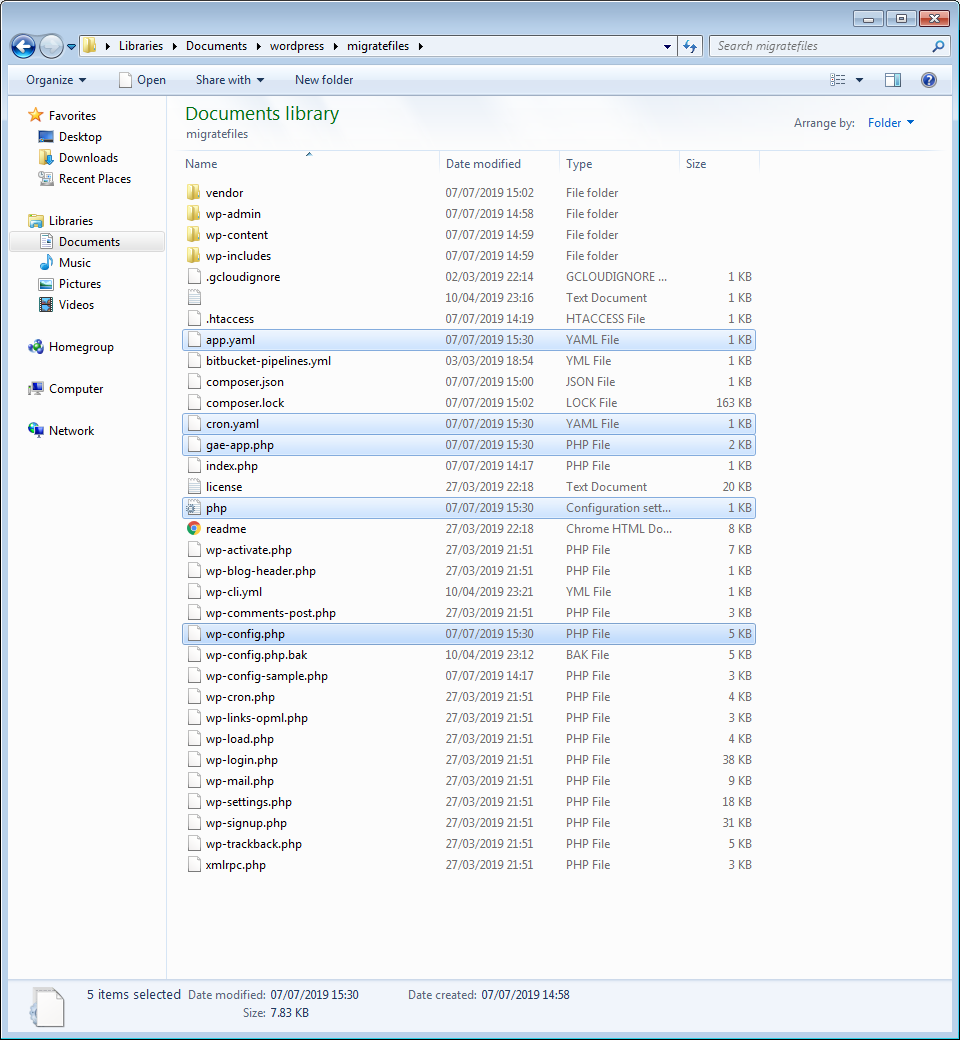
Please check over the following files to ensure they have the correct items configured, or the configurable options have the right data.
- wp-config.php
- app.yaml
Deploying your Wordpress files
Now you have your Wordpress files configured for App Engine you need to deploy them. Make sure your command prompt window is in the root of your Wordpress files. Your app.yaml and other App Engine files should be showing. Deploy your Wordpress files with the following command.
gcloud app deploy app.yaml cron.yamlThe deployment of your Wordpress will complete after a few minutes. Go to the App Engine dashboard to view usage and other items of your website.
By default, App Engine uses an appspot.com URL for your website. If you require a custom domain, you can follow this guide.
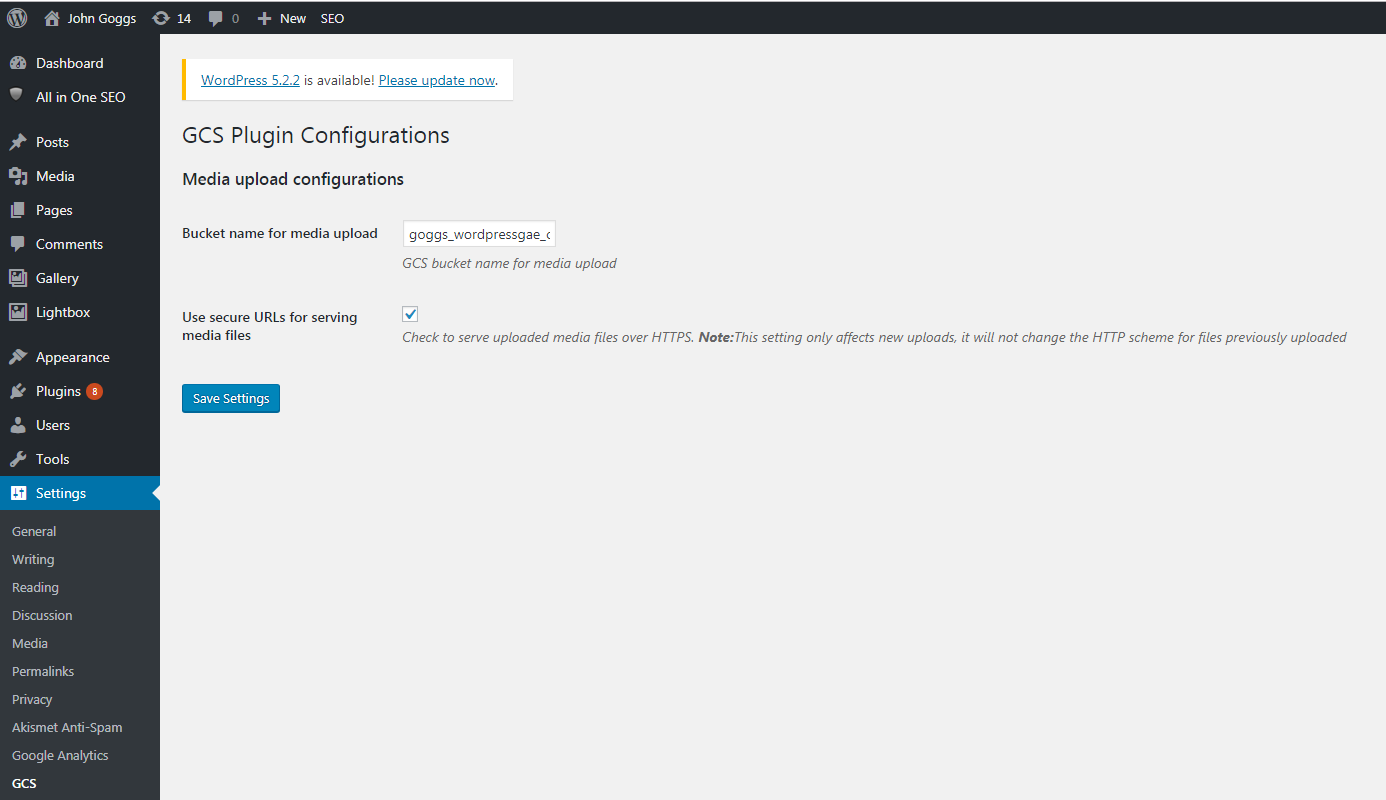
Configuring Google Cloud Storage plugin
Google Cloud Storage plugin connects your Wordpress website to your public storage bucket. This bucket will house all of your images and media files.
Log in to your Wordpress website, navigate to Settings and GCS. Input your public storage bucket id. Log in to your Wordpress website, navigate to Settings and GCS. Input your public storage bucket id. Any new uploads from now on will be automatically uploaded to your storage bucket, and your posts will have the correct URL inserted.
Migrating your images
Thus far, I’ve not touched upon how to migrate your images. Migrating images and media is not required, but in the longer term, it can help massively. We need to get all media files that were previously in your wp-content folder into your storage bucket.
Open up command prompt and change the directory to ~\Documents\wordpress\migratefiles\images\media. You should see folders by year. Run the gsutil command to copy all files to the storage bucket.
gsutil -m cp -r * gs://public_bucket_name/1/Now that all of your media files are in the storage bucket, we can leverage plugins to overwrite the URL structure within posts. The best plugin I’ve found is wp-stateless. There are different “stateless” options, allowing you to hook into Cloud Storage buckets, Cloud Distribution Networks and, so on.
Once you have installed wp-stateless, navigate to media, Stateless settings. Input the following config.
- Mode: Stateless
- Bucket: public_bucket_name
- Bucket Folder: 1 - for multi-websites using the same bucket, you would have another folder called 2 and, so on
- Service Account JSON: contents of your private key
Generating Storage service account
A service account and key are required to allow wp-stateless to manage your public storage bucket. This service account only requires access to your public storage bucket, with minimal permissions.
- create a new service account in IAM
- do not add permissions in the setup menu
- generate a private key
- navigate to Storage and go into the public storage bucket
- click on the permissions tab and add new member
- copy the email address of the service account from the key and add the Storage Admin permission
Additional checks
- ensure the App Engine default service account has Storage Admin and Storage Object Owner permissions on the public bucket
Updating Wordpress
Since App Engine standard is read-only, you will need to manage Wordpress updates for the core, plugins and themes on your PC. Once updates have applied, you will have to redeploy Wordpress.
To update Wordpress, you need to have wp-cli. If you do not have this utility, you can install it with Composer.
composer require wp-cli/wp-cli-bundleUpdate the Wordpress core
vendor\bin\wp core updateUpdate Wordpress plugins
vendor\bin\wp plugin update --allUpdate Wordpress themes
vendor\bin\wp theme update --all